I took some photos last week of my pop tab crochet method while constructing my messenger bag.
I am a bit pre-occupied with other projects at the moment and so this was on the back-burner for a while. I will finish it eventually…but in the meantime I wanted to share the method so those of you who are interested could get started with your own projects.
I make the patterns up as I go. I visualise each bag as a 3D shape and create the different components (faces of the shape) before assembling them all into the one piece. My current messenger bag will have three main components. The bag, the flap and the strap. The bag section is made as one large piece (approximately 50 rows of 30 pop tabs) that will be joined to create a seamless pouch. The flap (approximately 20 rows of 40 pop tabs) will be a rectangle matching the dimensions of the pouch opening and the strap will be a long thin shape (approx 2 rows of 120 pop tabs). I will have to ‘fill’ in the base of the bag – but I will cross that bridge when I get there!
How to crochet pop-tabs!
So how do I join the pop-tabs to make the fabric of the bag?
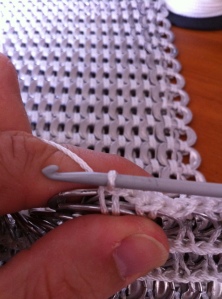
 As you can see the pop tabs are joined by a long row of single crochet which creates a seam which is hidden on the back side. The front of the fabric is smooth and only the flat part of the seam is visible.. The pop tabs are overlapped with right sides facing and then crocheted through the holes. Each stitch passes through four tab holes at a time – the outside two tabs are crocheted through the top hole and the centre two tabs are crocheted through the other hole. One new tab is added on the outside for each stitch. All other tabs are already forming the fabric as you go.
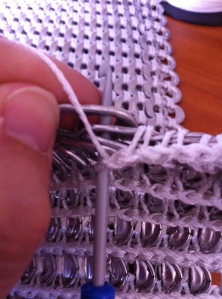
In this first photo I have inserted the hook ready to add a new pop tab … the hook is inserted through the top hole of the first and closest pop tab and the through the second hole of the other two.
.
.
.
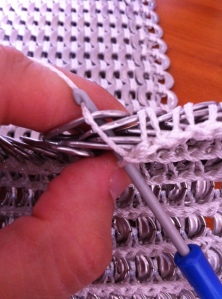
In this second photo, I have added the fourth pop tab for the stitch and have passed the hook through its top hole.
.
.
 .
.
.
.
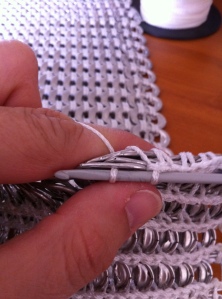
The yarn is drawn through all four poptab holes.
.
.
.
 .
.
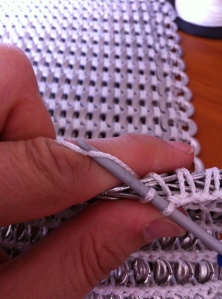
Proceed to complete a single crochet stitch by drawing the yarn over the hook and pulling through the two loops on the hook as in the next photo.
Before adding a new pop tab for the next stitch, crochet 1 ch (one chain stitch) to create a little space between stitches.
.
.
At the end of each row (which incidentally reflects the depth of the bag you are creating), end off and burn the nylon thread to avoid it unravelling.
Let me know if I have missed an description or explanation – I am happy to continue to post as much as needed to help you enjoy this process.
Bindy


